Search ...

Showing posts with label Angrakha. Show all posts

Sep 15, 2010

Angrakha - Competing in Shabby Apple Dress Design Competition

I have chosen this Angrakha i designed, drafted and stitched to compete in
Dress design for Shabby Apple dresses

As you can see bright colored clothes suit this design best. Trims when used on neckline and on Angrakha neck seam finish will pep up the outfit.  I have also added another Angrakha a different design i had created  sometime ago for my sister & SIL. Any of the designs or all 3 of them  can be chosen for the competition. Keeping my fingers crossed!

                      Angrakha for Self                                                 Angrakha for Sister & SIL

P.S.
Yay! This Angrakha  made it to Craftster - This Rocks section and also on Featured Projects on Burdastyle today. Thank you God.

I am on Cloud Nine, please don't bring me down !!!!

Also updated the same for the Angrakha sewing tutorial post


Angrakha for Self - BackView


Share/Bookmark

Aug 31, 2010

Tutorial - Angrakha Pattern Drafting Part I


For Sale - Kids Custom Clothing From Adithis Amma Sews- Click Here


Online Teaching takes a new meaning with all those Tutorials floating online for free. Here is one from AdithisAmmaSews


Would YOU Like to Sponsor this Tutorial - Please Check  PR Page for details!

Privilege Sponsor of the Tutorial


Angrakha_Pattern_Drafting_Tutorial

Iam glad to have got back to posting tutorial. Please feel free to leave your feedback in comments so that it will help in iron out flaws if any and also make it better in future and also would motivate me to do share more of pattern drafting expeditions. In case if you any doubts, please raise the same and i would be glad to sort them out.

Today we shall see part I of Angrakha Tutorial. This would involve drafting the Angrakha part.

You will Need
  • Shift Dress / Kameez Draft - as base
  • Ruler
  • Pencil
  • Scissor
  • Cellophane Tape
  • Pattern Paper ( I normally use newspaper to draft patterns, RECYCLE!)
STEP 1: Trace the basic draft you have either Shift Dress / Kameez Draft with Paper on Fold
STEP 2 : Mark Bust Point


STEP 3: Mark 1 Inch from Bust Point (Approximately, depends on how curvy you are i am size 34 and it suits fine with me, increase or decrease  1 inch as required) from the Bust Point. Name it as B.
From HPS (See pic - High Position Shoulder point) mark a point perpendicular to Point B and name it as C


STEP 4: Draw the neckline for the angrakha from HPS to Point C and then finish the wrap seamline from C , crossing through point B upto Point D. 

P.S: Point D can be any distance as desired from the fold line 


Step 5:  To get the flared effect as the case is with the Angrakha i drafted for my sister, follow the steps 5, 6 & 7 or else you can retain the draft got from Step 4 as the Angrakha draft
(How to use it and sew with the base pattern and where to place ties we shall see in Part II of the tutorial)


Step 6: Cut along the slashed lines; Paste or anchor the pattern with Cellophane tape at HPS and spread the slashed lines to desired width,remember the flare fold will be half of what you get to spread, i.e., if you spread for 2 inches, then the flare will be 1 inch deep. Spread and paste to anchor it; do likewise for all slashed lines


Step 7:  Retrace the spread out pattern all through. 
P.S. Did you notice hemline is slightly longer than the actual slashed piece ends, this is to compensate for the folds that you end with somewhere at where the slash lines end. These folds will reduce the height a bit when they fold in, hence we add to the hemline as is required 


Now that we have the draft ready, how to integrate it with base draft and sew the same with ties will be dealt with in Part II, which i promise to post next week.  So please draft the same and keep it ready.

In case for those who can manage to sew yourselves, see below for steps to do

  1. Cut 1 piece from the above drafter angrakha piece
  2. Cut your front pieces and back pieces of the base pattern (Shift dress / kameez draft) as usual
  3. Finish necklines; sew darts as is in base pattern
  4. Attach Angrakha piece to front piece at shoulders with right side of front piece underlying the wrong side of angrakha piece (as you would for a mock-wrap dress)
  5. Sew shoulders of front and back pieces together
  6. Finish facings
  7. Attach sleeves if you have them in your pattern or finish sleeveless draft (I have used  3/4 sleeve with a slit in my version)
  8. Stitch side seams 
  9. Finish with rolled hem 

If you find the above steps unclear or overwhelming, fret not i promise to deliver the acutal assembling part and sewing by next week. - Here it is: Angrakha Sewing Tutorial

Tomorrow is Gokulashtami (Birthday of Lord Krishna) and i have a busy day ahead as we have to prepare culniary delights to be presented to Lord. Hmm yummy seedai, murukku and so & so.... i am drooling. I also plan to dress up my daughter (as i do every year during Janmashtami aka Gokulashtami ), the past 3 years she has dressed up as Lord Krishna himself, this time let's see if she obliges....

More Tutorials can be found here

Click Here to Pin This to Pinterest Pin It


Share/Bookmark

Aug 20, 2010

Angrakha - This time for my Sister.....

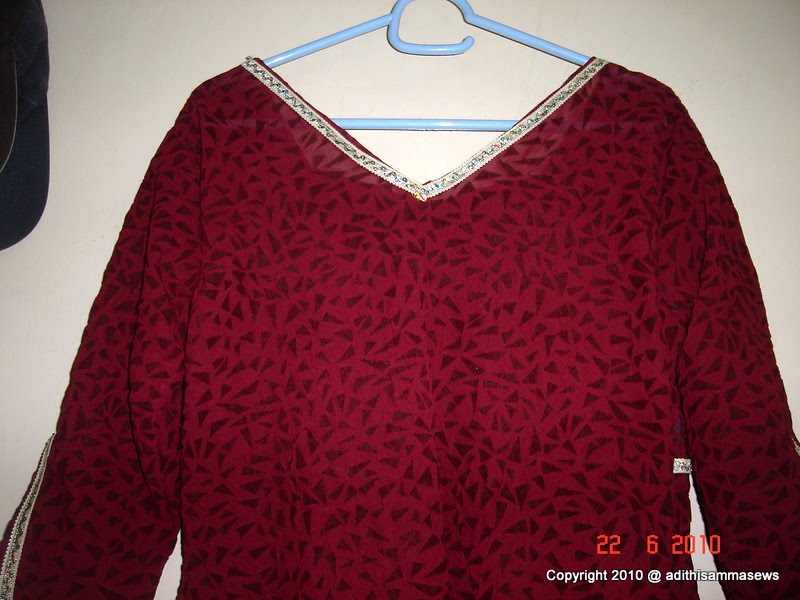
This is the outfit i managed to sew for my sister to wear on her best friend's engagement day.
Hope to make my Sister's own engagement dress soon ....


Today was the engagement of  my sister's best friend from school. So i thought of making her a new outfit to glow in. The fabric is similar one which i had stitched Angrakha for my SIL
Since i had only a day (read 4 sewing hours to make do with) i decide to make Angrakha itself as the fabric drapes well for this style. But made slight changes in the drape.

Since my sister is slight built compared to my SIL, i had more fabric to play with, hence more drape on the wrap of the angrakha. One thing to try in next Angrakha (i want to make one for self, hopefully soon...) would be drape on the side where it wraps as well. Lets see, there's no end to experimenting....

The trim that is used here was bought for Rs.4 a mere and is worth every rupee spent on it. The trim inspired to work more with it than just as usual neck and sleeve embellishment, so started by placing it on the wrap of angrakha freehand, and let my mind waver here and there and ta da.... there is the result for you to see. I really like the effect, it adds jazz to the outfit but is defintely not over the top and that is what i call subtle elegance. 

The drape of wrap is on the side seam and the picture angle does not seem to get it right, will coax my little sister to wear it yet again and pose for it in all possible angles and shall make sure to update this post, only then will the drape of the wrap will get justified as most of my time drafting this outfit was spent on it......


Unfortunately the trim got almost over (used the pending last bit on my next project, will post it 2moro it is a memorabilia for my daughter's best friend who is leaving for US). So planning to rush to the same shop from where i got it and get loads of it. 

Speaking of trims, after getting the reload of it 2moro, i will share my khazana of Trims and fancy items which i plan to use for embellishment...... believe me they need a separate post and are well deserved one too ..... Watch out!

Share/Bookmark

Jun 22, 2010

First Ever Angrakha.....


Would you like to sew yourself an Angrakha check this Tutorial on Pattern for Angrakha and Sewing instructions for Angrakha
I had earlier posted few inspirations for my attempt on Angrakha.

This one is for my SIL. I have similar fabric and will try another type of Angrakha for my sister. Watch out.

This Ankrakha has another layer on top normal kameez.
The top covers 3/4 width and is of same length as kameez and is flared .
Trims were used to jazz up the wrap around layer and neckline.

After finishing discovered that the neckline was bit too deep, hence added the patch as a workaround, guess what it looks as if it was part of the original design, way to go...

I love it, keeping fingers crossed as to how it would look on her and as also the fit ... lets c... till then catch these snaps... action shots later....

Bodice Top Part


Are you able to identify the wrap part and the flare.. ???? 


Sleeve is 3/4 with slit pepped up with trim


VNeck - Back View


Share/Bookmark

Jun 16, 2010

Angrakha style kameez - Design inspirations...


Planning to make an Angrakha style kameez for my SIL, since it is my first attempt, searched the net for inspirations, and these are what that held my attention, lets c how my version turns out....

In fact have made 3 angrakhas so far, one for my SIL, Sister & Self.... check them out here
If you wish make yourself an Angrakha see the TUTORIAL - Angrakha Pattern Drafting and Angrakha Sewing

Authentic Angrakha


Anarkali + Angrakha
http://utsav.cc/kcr1966c
http://utsav.cc/kma107a
Faux Angrakha
http://utsav.cc/kza100

Share/Bookmark

LinkWithin